3/31/07

Jews With Power Tools, Oy!

I spent the summer in the woodshed, literally not figuratively. Having sold Lillian Vernon with the Zelnick / Ripplewood folk, I took the opportunity to do something other than jump right back into the working world. I decided to take some time and build myself an Armoire. In and of itself a fairly unremarkable decision.

However, if you are like my friends and family (note: if you are reading this, Google PhD's have determined there is a 99.29387% chance that you are my friends and family) you are probably wondering what a nice Jewish boy is doing with power tools? I say this because every time I told someone that I was building an Armoire they asked "what's a nice Jewish boy doing with power tools? Then they would ask lots of other questions. I wanted to answer these questions and, realizing mailing everyone a letter would dry out my tongue, figured I would write this blog.

The following posts will answer the questions my friends and family have asked, including:

I will also share some of the "Workshop Wisdom ©" I picked up along the way. This is after all a Blog and I think that means ICANN and or Vince Cerf can fine me unless I add my drop of insight into that giant bucket of commentary that is the Blogosphere.


Hints for Readers:

  1. A picture of the finished piece is at the bottom. If you are not among the friends and family that actually want your questions answered and just want to see the darn Armoire you have been hearing about for months (yes, I know, months) …skip ahead.
  2. This blog is best read from top to bottom. Oddly enough, some earlier posts (lower down) reference later posts (toward the top). Don't ask.

Enjoy;)

Why Build An Armoire?

There were a few reasons I wanted to build the Armoire.

  • I needed one. Old one was too small and not well made.
  • Had the time. Sold a business and grabbed the opportunity to do something other than jump right back into the working world.
  • Like working the wood;) Ever since I was a kid woodwork has been a hobby I have enjoyed. More on this below.
  • Had a vision. I knew pretty much what I wanted.
  • Good way to stay balanced.

More on this Balance point: I have spent the last 20 years mostly working in businesses that deal with products that are hard to touch: finance, consulting, Internet businesses, etc. Woodworking is very tactile. Each cut, every sanding stroke, each pass with the spray gun transforms what you are working on. You can see and feel the progress. I like that. I also like the fact that wood is imperfect. Woodwork is a constant negotiation between the original vision and the realities of the wood, with all its flaws. Working through the “what you got v.s. what you want” in a piece is a great way to stay balanced. It forces one to abandon type A, perfectionist tendencies and remember there is beauty in the imperfections.

Can Jewish Guys Really Build Furniture?

As Gomer Pyle would say, “Surprise, Surprise!” Yes they can. Or as my grandmother would say "sure you can do that, but why not get a profession just in case." Yes Jewish guys can be handy. In fact there have been some very famous Jewish carpenters even though they were not always well known for their carpentry.

I come by my woodworking skills by way of both nature and nurture (see below for more on the nurture part). My great grandfather, Harry Bloomstone, was a skilled wood worker. My older brother still has a table and mirror he made. My father, while not a woodworker, is a tinkerer and very handy. He built his own stereo as a kid and taught me many useful things like how to fix a toilet flusher. I spent many a weekend puttering around the house fixing something with him. Also, my mother’s side of the family is from Maine and Canada. All that Pine has to count for something. What ever raw ability I have had something to do with my Jewish ancestors.

How Did You Know How To Build It? How Long Have You Been Doing This?

In addition to any inherited talents described above, I have liked woodwork since I was a kid. When I was 6, my friend Kenny and I would go to Wade’s work shop. Wade was a friend of Kenny’s dad who made furniture. He helped Kenny and I build things with the wood scraps from his furniture making. I still remember the first model house I built. It had a lookout tower, an important architectural amenity to a kid who’s second favorite thing was playing war. Ever since my time in Wade’s work shop I have enjoyed building things.

Over the years I have built a variety of different pieces: closet interiors, tables, shelves, a cradle, the Armoire, cutting boards, etc. On each of these projects I have found a woodworking Rabbi (some shop owner) who is gracious enough to coach me through the tough parts of the project, rent me some space and let me use his tools. Jack Gavin (pictured) the President and Proprietor of St. John’s Woodworking,
was my Rabbi on the Armoire (and cradle) projects. These projects and the associated coaching sessions have taught me how to work with wood.

Workshop Wisdom: Know what you don’t know and ask! During all my projects I have come across tricky tasks that were new or required some figuring out. Once a tricky task was identified the coaching process began. On the Armoire it originally worked like this:

  1. Stare at the problem for a while and figure out a couple options.
  2. Try one of the options.
  3. Store newly created scrap wood.
  4. Ask Jack how to do it right.

After a few times with this original process I shortened it to:

  1. Ask Jack.

Yes, I had some experience and new a lot of the basics. But, I had forgotten a lot in the 11 years since I built the cradle for my son. Also, this was the biggest project I had ever undertaken. It only took a few unplanned trips back to Rosenzweig Lumber to convince me that asking for help before I turned on the power tools made sense. Which reminds me of another bit of Workshop Wisdom: Mistakes happen, buy enough extra wood. It took only a couple more trips to the lumber yard to convince me that even after I got the right coaching from Jack, and practiced using the new tools, mistakes still happened. I learned it was better to buy enough lumber on the first trip.

Did You Design It Yourself?

Yes, I designed it. It is a one of a kind piece. The design process was pretty simple. I had a rough vision for what I wanted. Armed with this vision, I went to a bunch of furniture stores to see similar pieces and take pictures, notes, measurements etc. (Note: the folks at ABC Carpet are not as friendly as the people at Ethan Allen.) I then took all this info and sketched the rough design pictured here . From there I drew similar sketches for the major components (base, drawers, top, etc.), about 12 sketches in all. While not precise architectural drawings, the sketches did provide me a clear picture of all the component pieces I needed. From the sketches, I created a cut list. The cut list included all the parts I would need to make, the material to use for each and their dimensions.

The sketches and the cut list were good enough to guide the building effort. Which brings me to another point of Workshop Wisdom: Don’t make the first cut until the cut list is complete. Hardwoods are expensive and come in big planks. It’s a lot easier to make small pieces from big than big from small. Having the cut list is essential to figuring out what pieces to mill first.

Q. As part of the design question, I often got asked Did you pick the hardware?
A. I did pick the hinges but Susan, my wife, found the door handles and pulls. The handles resemble twigs and the pulls river stones which added a nice "hey I found it in the forest" feel to the piece.


How Long Did It Take?

This question was usually phrased "How long does it take? Is it done? Shouldn't it be done? Daddy when will you bring it home?" Followed quickly by "But that’s what you said last week, can’t you just bring it home!"

This is not the first woodworking project I have done. As my wife Susan, can attest, the results are usually pretty good but I am slow. Slow with a capital Slow. Slow like the line for stamps slow. Slow, Slow, SLOW!

When I asked the expert, Jack, how long this should take an experienced furniture maker, he said 40 hours. Knowing that I am not experienced, I took that estimate, doubled it to 80, and added another 20 hours for safety. As I was designing the piece, Susan asked how long it would take to build. Having consulted the expert, and padded the estimate, I replied confidently…100 hours in the shop. Susan’s immediate response was, “oh you mean 200 hours.” To which I only smiled, knowing my guess had lots of room to spare.

So how long did it take? Easy, 237 hours in the shop! That’s right 237 hours. So, like I said, I am slow. Do the math. If I got paid what any real carpenter got paid for a custom piece, this armoire would cost $30,000, and that is before parking tickets. (see How much did it cost? below for more on the parking tickets.)

Which brings me to another bit of Workshop Wisdom: Plan, Plan, Plan! In the wood shop, like business, good planning is always a time saver. I understand the resistance to planning. Excuses like, “there is no time to plan, we need to get started to beat the competition, maybe if I Blackberry during meetings I will look too busy to plan, etc.” are common, but not planning always takes more time.

To wit, I also know what its like to be introduced to a new computer controlled power tool that can rip through huge chunks of lumber in minutes with spectacular precision. Schweeeet!
Yes, I am a card carrying member of the NWA, Nerdy Woodworkers Association. Jack possesses just such a machine, the C&C (Computer Controlled) router pictured here.
Those of you who share my fascination with precision, computer controlled power tools can understand how I threw planning to the winds and rushed ahead. Jack programmed in all the specs and the C&C cut up all my drawer parts before double checking the plans. Since I rushed, you should not be surprised to learn that after I put the drawers together, they were approximately half the thickness of a junior mint too big. So close but yet so far. They did not fit! Which brings me to a good example of why everyone has heard that old bit of Workshop Wisdom: Measure twice, cut once! Planning and measuring and checking the plans and re-measuring will always save time, especially if you are cutting up 20+ pieces with one C&C run.

Are You Building It In Your Apartment?

Nope, that would be Mashugga. As they say on Fear Factor…”Don’t Try this at Home.” I built the piece at St. John’s Woodworking, 68 34th Street in the Sunset Park section of Brooklyn. Trees do grow in Brooklyn just not in Sunset Park between 2nd and 4th avenues. Sunset Park is totally industrial. Which was good because the piece is big and the process messy.

This armoire is, 90” High x 36.5” Wide x 22.5” Deep. When you want to dry fit a cabinet like this to see if your pieces are working together you need space and lots of it.

When I say the process is messy I mean Messy. It’s made out of 60 Board feet of raw hard maple, maple veneer plywood and various moldings. It is finished with 3 coats of lacquer that give off fumes that Nancy Reagan would just say no to. All the raw lumber had to be joined, planed, ripped, cross-cut, sanded (all woodworking synonyms for creating sawdust) and glued. Then it all had to be sprayed with finish carrying Surgeon General warnings. If you have lived through a home renovation project while living in your house you understand. If you have not, dump 60 gallons of sawdust in your living room, pour some noxious chemicals over the top and spread it all around with a leaf blower. You are starting to get the picture of messy.

St. John's 20,000 square feet of space offered just enough room for tools, construction space and mess making.

Do You Really Own Power Tools?

I have a tool box with your basic set of screw drivers, pliers and wrenches. A hand saw, a hammer, 1 quick clamp, a power drill, some duck tape and two Swiss Army knives. So no, I don't really own a bunch of power tools. But I know a guy...


This question was especially curious to me because, while it is technically possible to have whittled this Armoire using hand tools, it’s not really feasible. It took me 237 hours in the shop where I had access to the latest tool technology. Hand tools would have taken forever. Having shaped roughly 300 individual pieces in the Armoire, using great tools, I have a new found, and deep, respect for furniture makers of the past and the Amish.
Here is the process almost every piece took to shape.

1. Plane one side of a 3” x 8” x 72” maple plank flat.
Luckily, the Planer pictured to the right does this job with almost no skill required.

2. Use the joiner pictured at left to square (wood shop lingo for creating a 90 degree angle) an edge to the flat side of the plank.


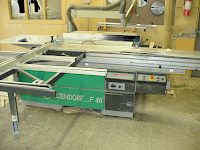
3. Rip the lumber on the Altendorf (a fancy table saw pictured right) to approximately the correct width, leaving a little (½”) extra for final shaping.

4. Let the lumber sit over knight so the new tensions in the wood could let it find its new shape. Lumber is a fibrous, malleable, living thing that will bend in slightly different ways as you trim away pieces. You have to iterate to make it square.

5. Use the planer again to rough cut (rough meaning to within 1/16”) the desired thickness.

6. Re-rip the piece to within 1/16” of the desired width, again on the Altendorf.


7. Use the power sander to take the final 1/16” off the top and the sides. Note to other NWA members, the power sander is one cool tool. You pass the pieces thru the machine on a belt and it sands off as little as 1/64th of an inch of wood with each pass. You end up with a perfectly smooth, and flat, 120 grit finish. Beats the hell out of sanding blocks;)


8. Cross cut the piece to proper length once again on the Altendorf table saw.

Which brings me to another couple bits of Workshop Wisdom: The right tools make all the difference and Practice using New Tools! The need for the right tools should be evident from the description above. The need for practice less so. The Good news is today’s power tools can rip through hard woods like a hot knife through whipped cream. The Bad news is today’s power tools can rip through hard woods like a hot knife through whipped cream. Better to learn how to handle the tool by destroying a piece of scrap than your very expensive, already half finished, maple crown molding! Trust me, I know.

How Much Did It Cost?

The Armoire cost roughly $2,850, which includes the $350 in parking / traffic tickets I received.
If you were to go out and buy an Armoire of this size you could pay anywhere from $600 to $26,000. Median price for something made of real wood and decent quality would be between $2,500-$6,500. Custom pieces would be more. But the point was not to get an Armoire for less. Point was to make it. So even though I could have bought a piece for about the same money, and avoided the parking / traffic tickets, it would not be the same.


So what about those parking tickets. I drove to the shop most days which meant I needed to park. Four lessons learned about driving / parking in Brooklyn.

  1. Brooklyn has hidden traffic cameras that will take your picture. Especially if the yellow light you just ran had actually turned red.

  2. New York cops, once they have begun writing a ticket, do not want to hear any bellyaching about how the meter expired only 1 minute ago. Nope, expired means expired!

  3. Avoid parking at meter spots near Dunkin Donuts. Traffic cops are likely to be finishing a donut at the exact moment your meter expires.
    And most importantly,

  4. Just because no one ever walks on a side walk, let alone wheels along in a wheel chair, does not give a driver permission to block the curvy light colored concrete thing in the sidewalk (see photo) that provides wheelchair access. And, it will cost you $165 if you do. In case anyone was wondering, that’s my silver Honda next to the curvy light concrete thing along the sidewalk in the industrial section of Brooklyn that no one ever uses.


What Is It Made Of? Where Did You Get The Materials?

The Armoire is made of:
  • 60 Board feet of solid hard maple. The wood pile pictured is the 60 Board feet of hard maple after many hours of planning, joining, ripping, cross cutting and sanding the raw planks.
  • A few sheets (8’ x 8’) of book matched (i.e. fancy) maple veneer plywood.
  • One sheet of Baltic Birch plywood for the drawer insides.
  • About 16’ of various moldings for the crown and the door panels.
  • Solid brass hinges with an antique finish.
  • Brushed steel door handles and drawer pulls.
  • A couple gallons of lacquer and stain for the finish.
  • Some screws, lots of glue, a few finish nails and joinery biscuits.

The raw Lumber was purchased from Rosenzweig Lumber in the Bronx. (Yep Jewish folk sell lumber too.) They have a good selection of unfinished hardwoods. I took my sons over and we selected the planks I would use. The molding was purchased at Dykes in Brooklyn, because Rosenzweig did not have the molding in maple. The Hardware was bought at Gracious home and online. Note: The same Solid brass hinges from a high end designer store in Manhattan, that cost $34 a pair, cost $18 / pair online. The remainder of the material was purchased at Home Depot and Lowes.

Is It All Wood With Fancy “Whatchmacallits” (Dovetails) Or Are You Using Nails And Screws?

I used a combination of old fashioned joinery, new fangled joinery (biscuits) and hardware i.e., nailing and screwing pieces together. It depended on what was needed.

I dovetailed the front of the drawers (pictured right) because with the constant pushing and pulling these joints need the extra support.


Pictured below are the hand cut mortises (fancy workshop talk for a rectangular hole) I chiseled for the base cabinet crossbars. The tenons (fancy workshop talk for the rectangular end of a piece of wood you cram into a mortise) for the cross bars were crafted using a table saw. I used mortise and tenon joints here for two reasons. First, because I could not figure out any other way to connect them without the joinery being visible. Yeah, yeah I know I should have asked Jack, but then I couldn’t have reason two, which was to be able to say I hand crafted mortise and tenon joints.


Which brings me to another point of Workshop Wisdom: Limit the number of things you have to get right! Mortise and tenon joints are hard because there are a lot of things one needs to get right. You have to be sure the width, length, location, side angles and depth of the mortises and tenons are all correct. Biscuit joinery is much simpler. You use a special tool to cut a slit into the pieces to be joined. Then, insert a wooden biscuit into the slits when you glue up the pieces. The tool cuts the slits with uniform thickness and depth and guides the cut to the proper angle. All you need to get exactly right is the locations of the slits. The result is straighter, more square, easier to make joints and fewer chisel gouges on your fingers. Yes chisel gouges hurt.

How Did You Finish It?


When I started the project I intended to hand finish the piece. I tried hand staining the interior walls of the base as a test and showed my handy work to Dorsey, Jack’s finish guy. Dorsey looked over the pieces I had stained and said, in the measured tones of an experienced craftsman…” that sucks.” There I had it. Dorsey’s unvarnished assessment of my finishing abilities. But frankly, they did look bad. Hand finishing wood is a specialty craft that takes lots of practice to be even moderately good.

Workshop Wisdom: If it aint right, say so. Dorsey could have been polite, could have said well that looks pretty good. He could have said well if that is the look you are going for blah, blah, blah. But he didn’t. He gave me his straight up assessment based on the quality standards to which he held himself. And that was great. I knew with certainty hand finishing the piece was not going to work the way I wanted it to.

So, after the other guys in the shop pulled Dorsey and me apart, I had a choice. I could do something different and try to create the piece I wanted, one with a fine finish, or I could stay the course and have my piece fall well short of the finish I had originally envisioned.

After the quick formation of a bi-partisan finish study group, I (being the Armoire decider) decided to glaze the piece. Glazing is where you spray multiple coats of lacquer on a piece to achieve the desired color. It’s easier to get right with limited experience and easier to correct mistakes. And, I called in the cavalry. Finishing the Armoire was really a team effort. I sprayed on the first coat. Dorsey sprayed the major color coat. Bruce (another one of Jack’s finish guys) and I touched up the color, where needed, with a final coat. This may sound easy but do not be fooled. Trying to make the finish on 30 component pieces similar and leave enough transparency to see the grain in the wood is hard.

Workshop Wisdom: Sometimes there is no substitute for experience. Finishing wood is a skill position. It’s not like playing defensive tackle or running a table router with a fence (fancy workshop lingo for a guide). It takes practice, practice, practice. If you don’t have the experience but want a pro finish, call in the pros.


The finish is a good place to end. There you have it, how I built my Armoire. The full picture of the completed piece is below. It was a great way to spend the time off.

3/1/07

Mazel Tov, Its Done!


Ta Dah! This is it.

The finished Armoire.

The Style is sort of Shaker with some Georgian influneces.

Special thanks to Jack and the gang at St. John’s Woodworking. Their guidance and helping hands meant a lot.


Hope you like it.